%20Dec%202023/DSC02757-1.jpg?width=2000&name=DSC02757-1.jpg)
%20Dec%202023/DSC02739.jpg?width=2000&name=DSC02739.jpg)

The Ultimate Guide to Google Ads
With more than 5 billion search queries every day, Google Ads leverages these billions of eyeballs to maximise clicks, leads and sales.
- Blog

With over 2.2 billion active users, Facebook is the undisputed King of social media and for good reason.
It’s never been cheaper to build your brand and create demand for your products or services.
Facebook is too huge for a business of any size to ignore — it’s where your customers hang out. In fact, the average person spends 28 percent of his or her time online on social networks — or 1.72 hours per day.
If you’re consistently creating great content for your website, you want people to know about it. That’s why you share updates across your social networks. Facebook Ads will amplify the reach of your content and allow you to target pretty much anyone. Any by anyone we mean it. Businesses can target users with Facebook Ads by location, demographics, age, gender, interests, behaviour and connections.
For many, Facebook is the internet. That said, is your business taking full advantage of it? Your answer should be yes — confirmed by Gary Vaynerchuk, CEO of VaynerMedia.
In an interview, HubSpot's Founder Brian Halligan, posed the question, "Let's say you're getting started today in marketing and you're building a social media brand — where are you spending your energy if you're that marketer?"
Vaynerchuk said, "... you can't be alive in the game without a Facebook [and an Instagram]. I genuinely believe that. I think it would be highly detrimental."
Below you’ll find everything you need to know to master Facebook. No matter if your business has had a Page for years or you’re just getting started, this comprehensive guide is for you.
So read along or bookmark this epic ultimate guide for later, or jump to the section that interests you most.
Before we get too deep into the specifics of Facebook advertising, I wanted to share this amazing list of pros and cons from the Moz blog, which is a really helpful starting point when deciding on whether or not to run Facebook ads.
Pros
Campaigns are easy to track
Immediate influx of traffic
Complete control over your daily budget and maximum Cost-per-click
Instant return on investment (You can easily define a cost per conversion and understand what your profit is)
More targeting options, including, towns, regions, age, likes/interests, income bracket, and other demographics
Easier to set up than Google Ads
The ability to reach people early on in the buying process, before they are aware of their need, while capturing those who are aware of the need in a subtle way
You can use images and videos to capture the interest of your target market, helping you to sell your products and services
CPC is relatively cheap, depending on your industry (On average, no more than $0.61 per click)
Cons
If set up and managed incorrectly, it can be costly, but less so than Google AdWords
Depending on your target market, the majority of the large potential audience can be irrelevant (For instance, we would not recommend Facebook Advertising if someone only served or supplied their products and services to one town)
There is no option to target your ads at certain times within the day or on certain days of the week unless you choose a lifetime budget
Most suitable for those operating in B2C markets
Reaching people too early in the buying cycle could potentially reduce your goal conversion rate
The majority of Facebook is made up of personal profiles, but that doesn’t mean that businesses don’t have a place on the platform. That’s where Facebook’s Pages come in. They’re Facebook’s equivalent to a business profile.
Pages look similar to profile pages but show specific information only applicable to businesses, organisations, and causes. Whereas you connect with a profile by adding them as a friend, you connect with a business Facebook Page by “liking” it and becoming a fan.
Pro tip: If you create a personal profile for your business instead of a Page, you run the risk of getting it shut down by Facebook.
To get started building your own Facebook Page, go to https://www.facebook.com/pages/create/.
On this page, you’ll need to give your Page a name — for example, your business, brand or organisation. You’ll also choose a category that describes what type of business, organisation or topic the Page represents. You can add up to three.
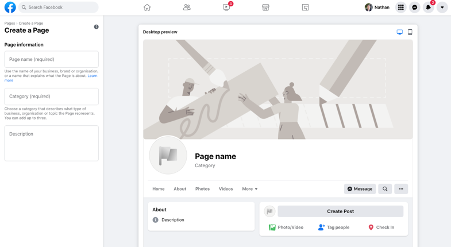
Pro tip: We recommend you choose the name for your Page wisely. Facebook will let you change your name and URL in most cases, but it can be a difficult and tedious process.
If you haven’t already, you’ll be prompted to sign into Facebook at this point. You must create and manage Pages from your personal Facebook account, however, your personal information won’t appear on the Page unless you add it.
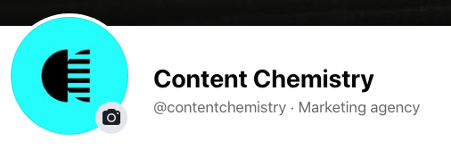
The next step is adding a profile picture will give your Facebook Page an identity. This will serve as the primary visual for your Page, appearing in search results and alongside any of your content that shows up in a user’s News Feed.
Most businesses will use their logo here. Facebook recommends a 170 x 170 (square) logo/image here.
Think of your profile picture as your first impression, and be sure to choose something immediately recognisable (like a logo). If you’re a speaker or public figure, go with a favourite headshot. Local restaurants or shops may choose an image of their most popular offering.

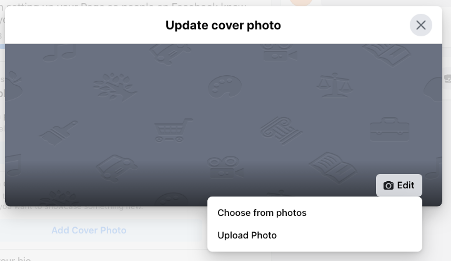
Next, Facebook will suggest that you add a cover photo. A cover photo is the large, horizontal image that spans the top of your Page. It should express your Page’s identity, branding and can be updated often based on special offerings or campaigns.
To upload a cover photo, click the “Add Cover Photo” option in the welcome menu. The official dimensions of a cover photo are 851 x 315 pixels. However, if your photo is not exact, you’ll have the option to drag to reposition the photo. Press "Save".
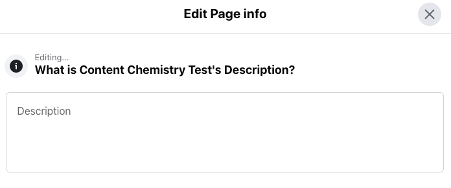
Next, you’ll need a description to let your audience know what your business is all about.
Click “Add Description.” Add one to two sentences (or 255 characters max) about your business. This description will appear both on your Page and in search results, so keep it descriptive but succinct. But don’t be afraid to show a bit of your brand’s personality!
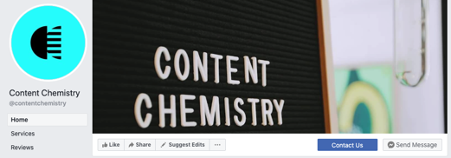
The next step is to create a username for your Page. Your username will appear in your custom Facebook URL (also known as a vanity URL) to help people easily find and remember your Page. You’ll have 50 characters to come up with a unique name not being used by another business.
By picking @contentchemistry for our agency, people can automatically visit our Page at https://www.facebook.com/contentchemistry.
Keep your Page’s unique URL handy. You’ll use them again when you begin cross-promoting your Page on your website, blog, and other assets to get more Facebook likes.
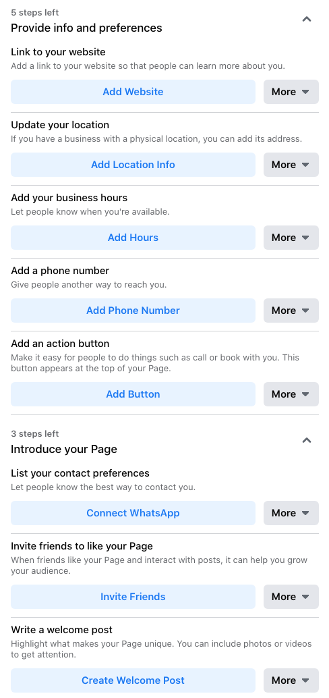
Once you’ve done the above, the next steps to complete the set up of your Page includes:
Link to your website
Update your location
Add your business hours
Add a phone number
Add an action button
List your contact preferences
Invite friends to like your Page
Write a welcome post
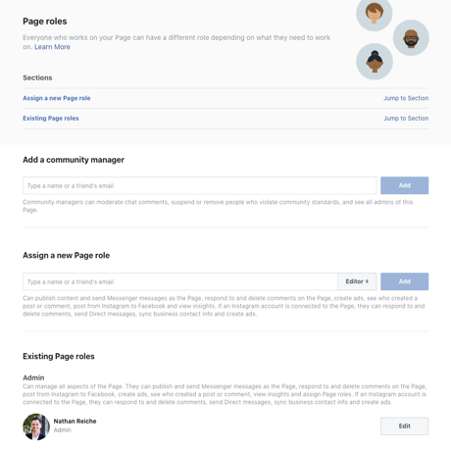
After you’ve set up the basics of your Facebook Page, the next (important) step is to set up who will be the Admin, Editor, Moderator, Advertiser, Analyst, Jobs Manager, etc for your Page. You do this via the Page Roles section of your Page.
Here are the various options when it comes to access:
Admin: Admins can manage all aspects of the Page, meaning they can send messages, publish as the Page, respond or delete comments, create ads, see which admin published a specific post, and assign Page roles. This person would have all the same permissions as the creator of the Page. Choose wisely.
Editor: Editors have the same permissions as Admins except for one key difference: Editors can’t assign Page roles to other people.
Moderator: Moderators can send messages and respond to and delete comments, but they can’t publish as the Page. They do have access to create ads.
Advertiser: Just as it sounds, Advertisers can create ads and view insights.
Analyst: Analysts don’t have any publishing power whatsoever, but they can see which Admin published a specific post and view insights.
Jobs Manager: Jobs Managers can do everything that an Advertiser can do as well as publish and manage jobs.
After you’ve set up your Page, the next step is to set up your Facebook Business Manager to allow you to manage your Page, Ad Account, pixel and people (more on that below).
This is definitely the preferred approach instead of managing your Page and advertising through Facebook’s “basic” Ad Center or Business Suite which has limited functionality and will cause headaches as you scale your advertising going forward (trust me!).
To set up a Facebook Business Manager Account, go to https://business.facebook.com/ and click on Create Account in the top right hand corner. You will be required to login to Facebook to start the process.
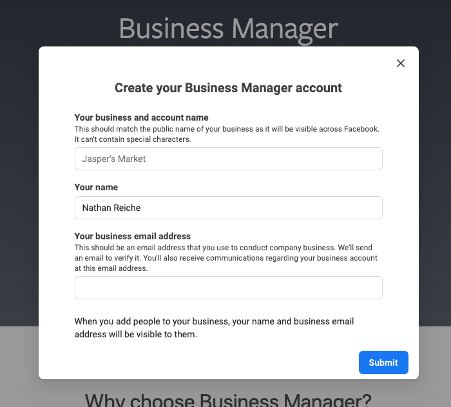
The next step is to add your business and account name, your name and your business email address.
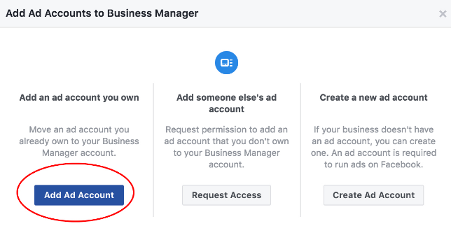
On your Facebook Business Manager homepage, you’ll immediately see the buttons to Add Page, Add Ad Account or Add People. Click on Add Page.
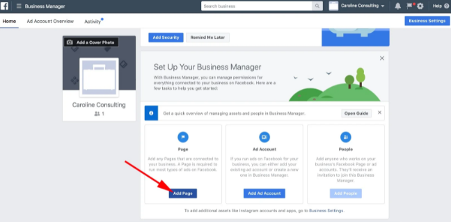
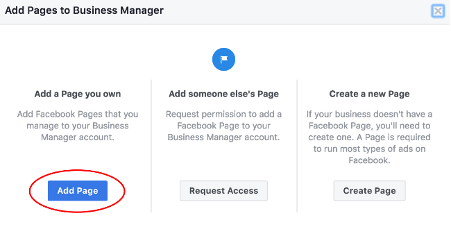
The first thing you want to do is to Add Page which will link your Business Manager to your Facebook Page.
The next thing you need to do is add your Facebook Ad Account, which is very similar to linking your Facebook Page, if you already have an Ad Account set up.
If you don’t have an Ad Account set up, see the steps below under the “How to set up a Facebook Ad Account.”
Pro tip: It’s important to note you can only add one Ad Account at first, and then you’ll be able to add additional Ad Accounts once you start spending money in your first Ad Account. However, you can’t host more than five Ad Accounts at any one time.

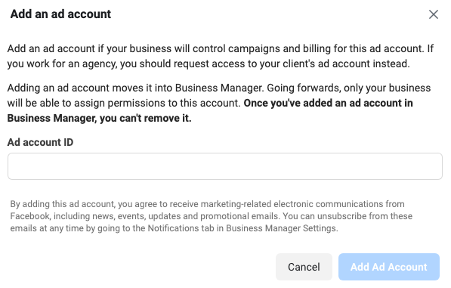
Then select Add Ad Account (if you have an existing Ad Account).
Then enter your Ad Account ID to link your existing Ad Account with your Business Manager.
The next step is adding people to join your business. Think employees, agencies, analysts, developers, etc. You just need to enter their email address, select what business role they need and click on next.
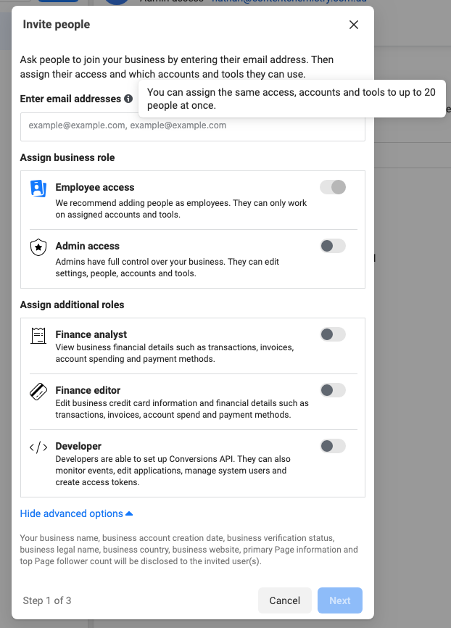
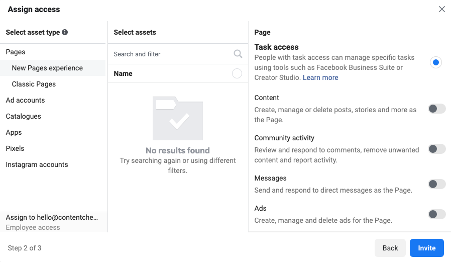
When you click “Next” you’ll be taken to a deeper list of options of access. For example, do you want to provide someone with access to your Page only, or your Page and Ad Account, or your Page, Ad Account, Pixel, etc. This is where you can manage this and you can come back to this at any time to update access.
Here is a list of options when it comes to access:
Pages
Ad Accounts
Catalogues
Apps
Pixels
Instagram accounts
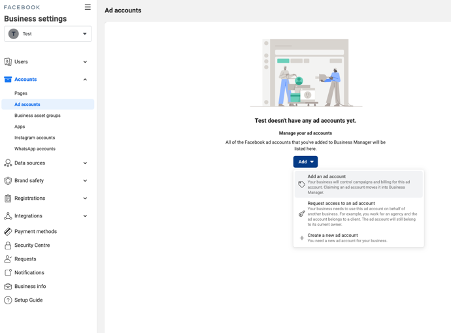
Once you have your Ad Account set up, you can start creating ad campaigns via Facebook’s Ads Manager tool.
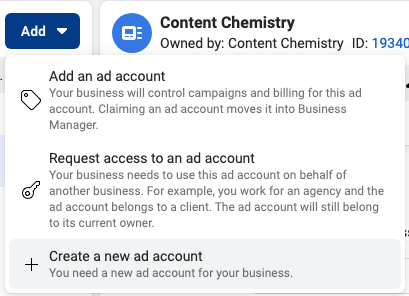
If you don’t have an existing Facebook Ad Account, you will need to “Create Account” instead of Add Ad Account in the previous step. The great thing is that you can do this from within the Facebook Business Manager.
Pro tip: If you’re a freelancer or agency, you can also “Request access to an ad account” instead of linking your client’s Ad Account to your Facebook Business Manager (a massive no no!).
Once you click on Create Ad Account, you’ll be prompted to input the name of your Ad Account name, time zone (super important as you can’t change later!) and currency.
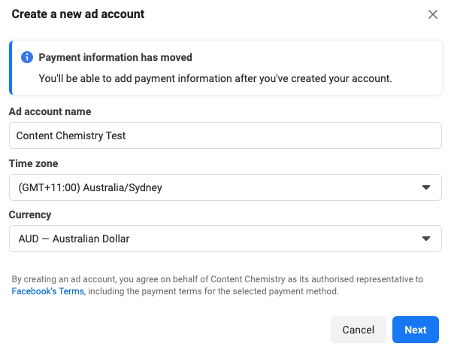
Pro tip: When creating your new Ad Account, make sure that you select the correct time zone! Once you set this, you can’t change it later and you’ll have to create a new Ad Account in the correct time zone. Having the right time zone is really important for reporting accurately.
After this step, you’ll need to enter your payment details.
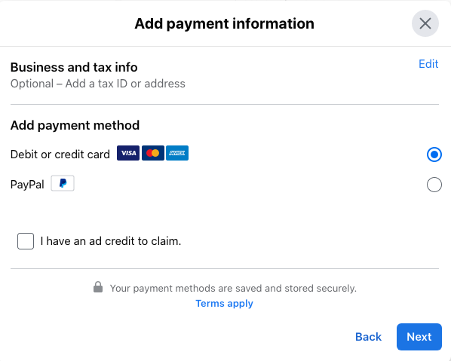
For a new Ad Account, Facebook will normally debit your credit card every couple of days, but once your Ad Account has a bit more time, you can push these debits back by a dollar value or timeframe.
Once you have your Ad Account set up, you can start creating ad campaigns via Facebook’s Ads Manager tool.
The next most important thing to do is to set up your Facebook pixel. You will need the pixel to create and manage any Facebook ads campaigns and to create Audiences (very important).
Having said that, with the death of the cookie, Facebook is recommending a move from Facebook’s pixel to Facebook’s Conversions API, but more on that in another post!
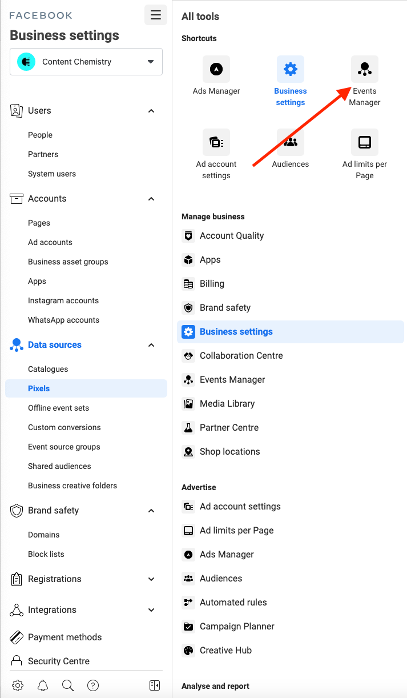
In the left hand side of your Business Manager under the “Business settings” section, you’ll see quick links to a range of tools within Facebook including:
People
Partners
System users
Pages
Ad Accounts
Business asset groups
Apps
Instagram accounts
WhatsApp accounts
Catalogues
Pixels
Offline event sets
Custom conversions
Event source groups
Shared audiences
Business creative folders
Domains
Block lists
News Pages
Leads Access
Payment methods
Security Centre
Requests
Notifications
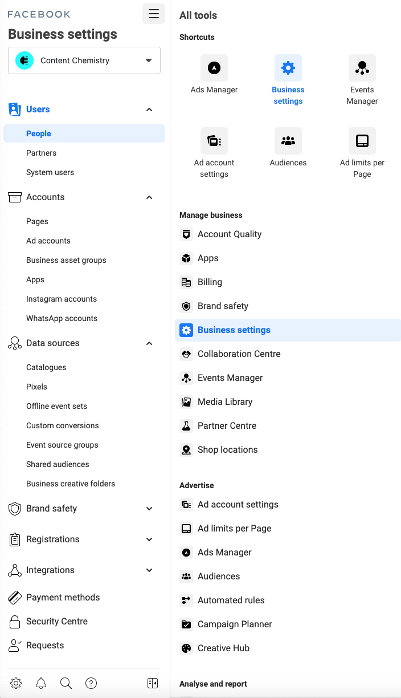
The one we want to focus on is Data sources > Pixels.
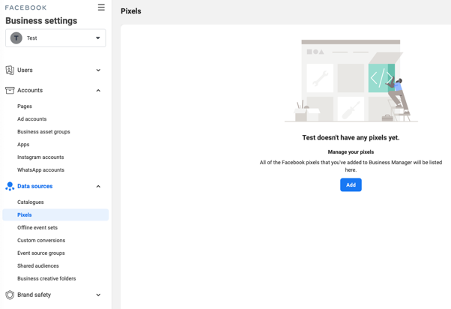
When you click on Add, you’ll be taken to this popup which guides you through the process.
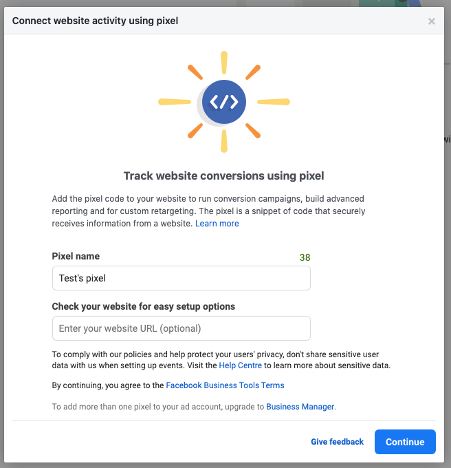
Once you’ve given your pixel a name and inputting your website URL, you’ll come to this popup.
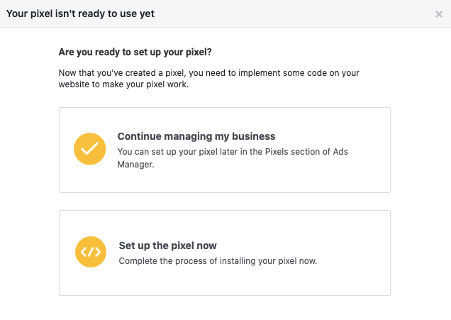
You’ll want to select “Set up the pixel now.” You’ll then see this popup.
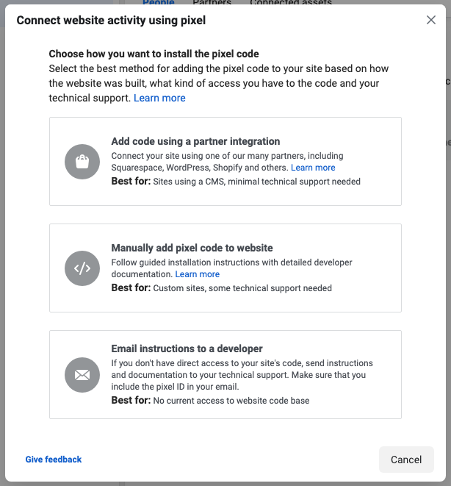
Call me old school, but I always like to opt for option 2 “Manually add pixel code to website” because I like to eyeball my pixel in the HTML code directly! You also have the option to add the pixel via your website CMS (e.g. WordPress, Shopify) or to email it to a developer. For the purpose of this blog, let’s run with option 2.
You’ll come to this popup next which provides the pixel code that you need to install on your website’s HTML in the </head> tag. If your website is on WordPress, there a bunch of ways you can do this using plugins like “Insert Headers and Footers.” Shopify also has a pretty easy way to add the Facebook pixel as does HubSpot’s CMS.
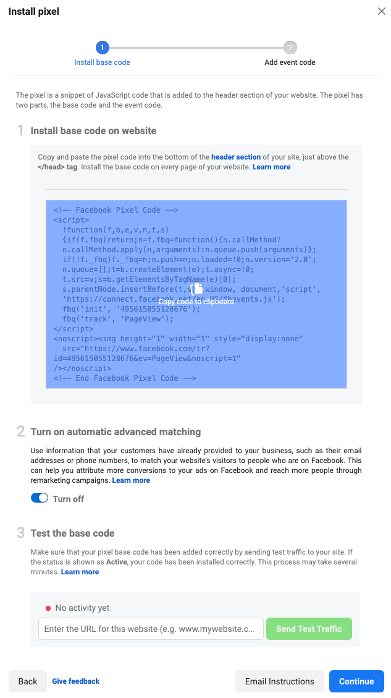
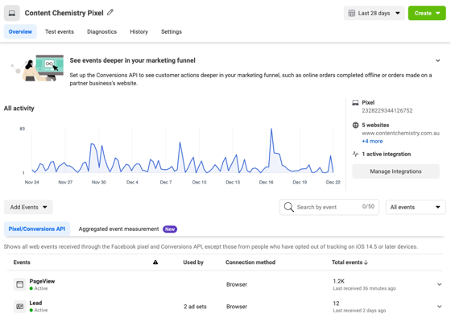
Once your pixel is live, you can start working with it from the Events Manager tool in Business Manager.
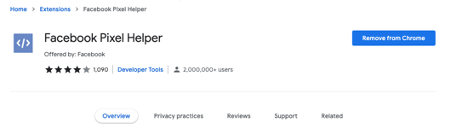
Pro tip: I highly recommend installing Facebook’s Pixel Helper Chrome extension, where you can quickly and easily check that your pixel is firing properly.
Verifying your website URL (domain) is an important step post Apple’s iOS14 update. It’s one of the measures Facebook put into place when iOS14 kicked in and started impacting the performance of Facebook ads.
You can start the process by going to Brand safety > Domains in the left hand menu of Business Manager.
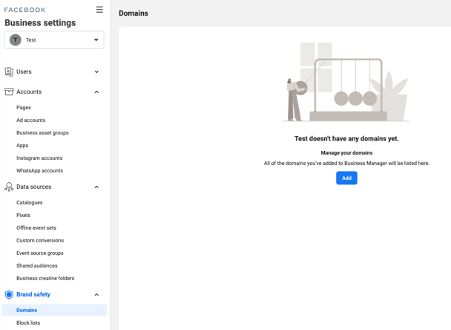
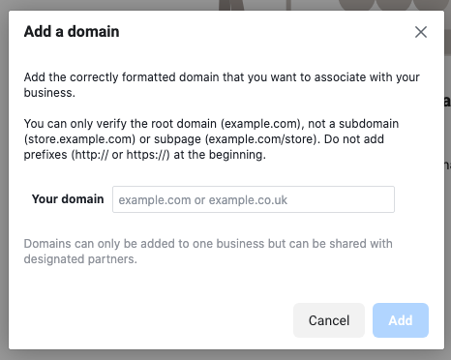
Click on Add and enter your website root domain.
You can only verify the root domain (example.com), not a subdomain (store.example.com) or subpage (example.com/store). Do not add prefixes (http:// or https://) at the beginning.
The next step is to verify your domain. Similar to the way that you added your pixel, you need to add a HTML code to the <head> section of your website. This is the easiest method, but you also have the option to:
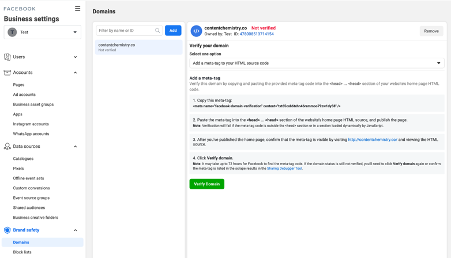
Once you’ve added the code to you website, you just need to come back and click on “Verify Domain.”
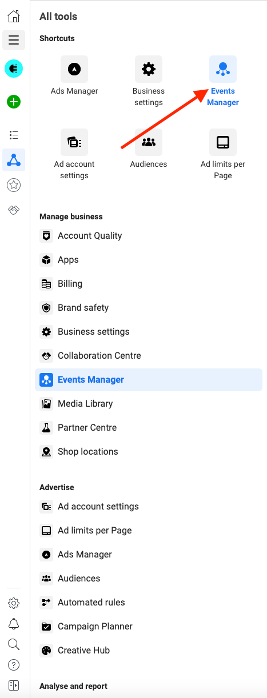
Once your domain is verified, you want to set up Events (or Conversions) to be able to accurately measure the ROI of your Facebook ad campaigns. To start the process, go to Facebook’s Events Manager (see above) which is accessed from the left hand menu.
Once you’re in Events Manager you have two options — create a “standard” event (conversion) or a “custom conversion.”
Let’s start with a standard conversion set up. Click on Add Events and then select “From the Pixel.”
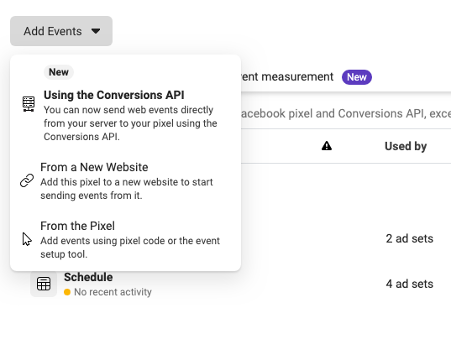
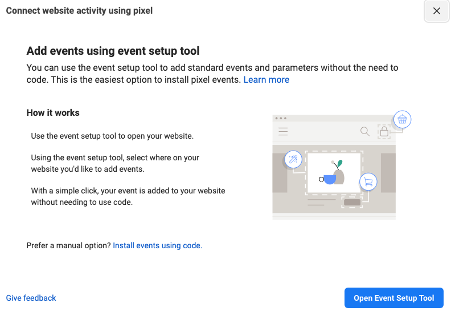
The beauty of standard events is that they work off the previously installed pixel and don’t require you to add any code manually like for custom conversions. Facebook’s Event Setup Tool makes this really easy.
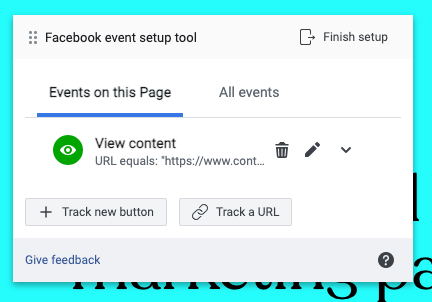
Click on Open Event Setup Tool.
Then enter the website URL that you view as an “event/conversion.” For lead generation, this is typically a thank you page (i.e. /thank-you) after someone has visited a landing page and provided their contact details.
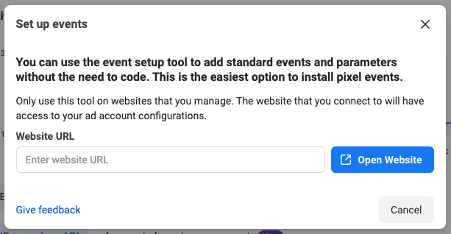
Click on Open Website and it will take you to the URL with this popup.
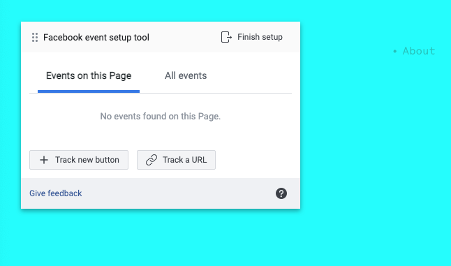
Here you can either track the URL itself as the “event/conversion” or you can even track the click of a button. For this purpose, click on “Track a URL” and you’ll see this popup.
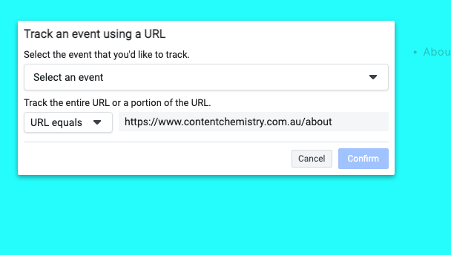
Pro tip: Instead of “URL equals” in the dropdown box which is far more restrictive, select “URL contains” which provides more flexibility when you’re tracking conversions.
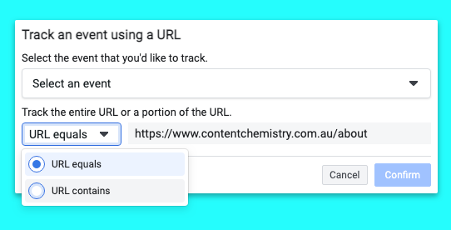
After selecting “URL contains” you also want to set up the type of standard event for this specific URL. Facebook provides a list of options here, including:
Add to cart
Initiate checkout
Lead (our favourite!)
Purchase
Add payment info
Add to wishlist
Complete registration
Contact
Customise product
Donate
Find location
Schedule
Search
Start trial
Submit application
Subscribe
View content
Once you select one of these standard events, you’ll see this popup where you can choose to add an event/conversion “value” which can help you calculate your ROAS.
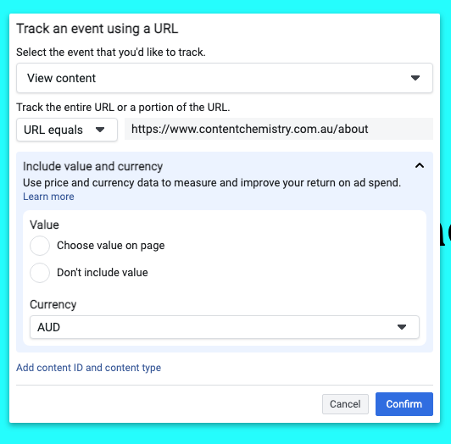
Click on Confirm and then “Finish setup” to complete your event setup.
Pro tip: You need to set up all required events/conversions you want to track before creating any Facebook campaigns.
Once your domain is verified and you’ve setup some events, the next thing you need to do is set up Aggregated Event Measurement, which is another post-Apple iOS14 recommendation from Facebook. You can access this from the same Events Manager tool.
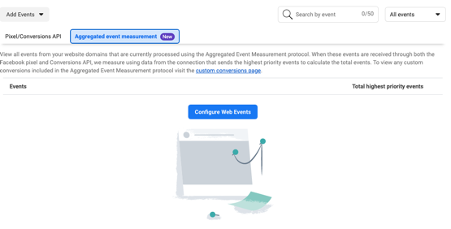
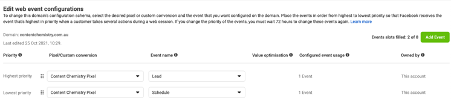
Click on the “Aggregated event measurement” tab and then “Configure Web Events.”
Here you should see your verified domain. Click on your domain to configure your events for iOS14.
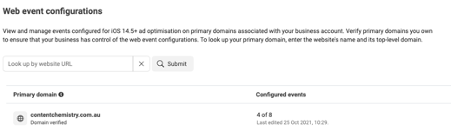
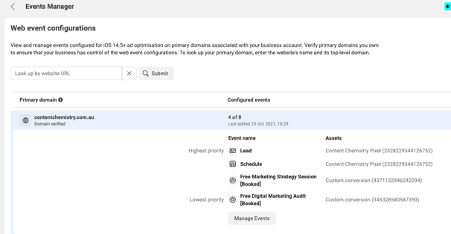
Then click on “Manage Events” and then sort your standard/custom events from highest to lowest priority. Place the events in order from highest to lowest priority so that Facebook receives the event that's highest in priority when a customer takes several actions during a web session. If you change the priority of the events, you must wait 72 hours to change these events again.
Facebook provides up to 8 event slots. Prioritise your events and then click on “Apply.”
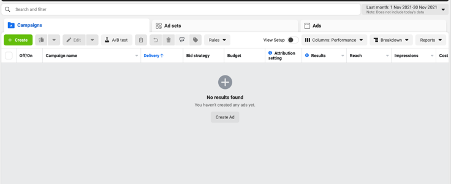
Facebook's Ads Manager is a sophisticated dashboard that provides users with an overview of all their campaigns. It’s also the hub where you’ll manage your Facebook campaigns.
The Ads Manager dashboard highlights an estimate of how much you're spending each day. The dashboard is organised by columns, which makes it easy to filter through your ads so you can create a custom view of your results. Key numbers like reach, frequency, and cost are readily available, making reporting on performance a no brainer.
Facebook offers a variety of paid ad options and placements, but all ads can be broken down into three elements:
Campaigns. The campaign houses all of your assets.
Ad sets. If you're targeting separate audiences with different characteristics, you'll need an individual ad set for each.
Ads. Your actual ads live within your ad sets. Each ad set can hold a variety of ads that vary in colour, copy, images, etc.
With that terminology out of the way, let's dive in to creating a Facebook ad campaign!
Click on “Create” in the top left.
Facebook's Ads Manager, like many social media advertising networks, is designed with your campaign objective in mind. Before getting started, Ads Manager will prompt you to choose an objective for your campaign.
There are 11 different objectives to choose from. The list includes everything from general brand awareness, to getting installs of your app, to increasing traffic to your online store.
By choosing one of these objectives, you're giving Facebook a better idea of what you'd like to do so they can present you with the best-suited ad options. As shown in the screenshot above, Facebook's campaign objective include:
Brand awareness: Show your ads to people who are most likely to remember them.
Reach: Show your ads to the maximum number of people.
Website traffic: Send people to a website, app or Facebook event, or let them tap to call you.
Engagement: Get more Page likes, event responses, or post reacts, comments or shares.
App installs: Show your ad to people most likely to download and engage with your app.
Video views: Show your ad to people most likely to download and engage with your app.
Lead generation: Use forms, calls or chats to gather info from people interested in your business.
Messages: Show people ads that allow them to engage with you on Messenger, WhatsApp and Instagram Direct.
Conversions: Show your ads to the people who are most likely to take action, such as buying something or calling you from your website.
Catalogue sales: Use your target audience to show people ads with items from your catalogue.
Store traffic: Show your ad to people most likely to visit your physical shops when they're near them.
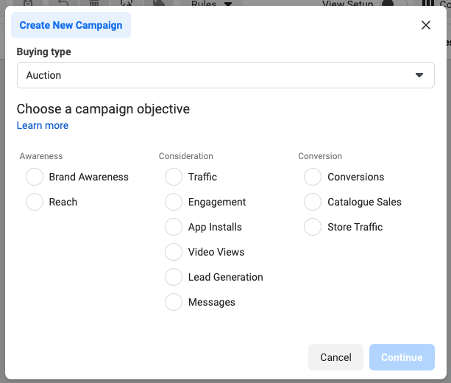
For this blog, we’ll go with “Conversions” which focuses on website conversions.
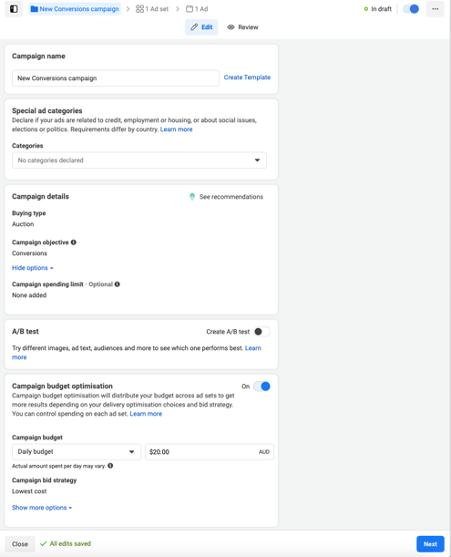
At this step, you have the option to name your Campaign, Ad set and Ad.
Pro tip: I recommend setting up a consistent campaign/ad set/ad naming convention right from the start. The naming convention should clearly indicate whether your campaign is:
Top of funnel (TOF) which is basically a “cold/awareness” audience who hasn’t visited your website or engaged with you on Facebook or Instagram.
Middle of funnel (MOF) which is a “warm/consideration” audience who has engaged with you on Facebook or Instagram.
Bottom of funnel (BOF) which is a “hot/decision” audience who has visited your website (or a specific page).
For example, for our clients our campaign naming convention is “CC – TOF” or “CC – MOF” or “CC – BOF.”
The next step is deciding whether you’d prefer “Campaign budget optimisation” (CBO) or prefer to manage your budget at the ad set level. We normally recommend CBO because it gives more control to Facebook’s algorithm to learn and get the best results.
Campaign budget optimisation (CBO) automatically manages your campaign budget across ad sets to get you the overall best results. With CBO, you set one central campaign budget. This budget continuously distributes in real time to ad sets with the best opportunities, throughout the course of your campaign.
Instead of setting individual ad set budgets, you set one overarching campaign budget. This budget has flexibility to spend more on ad sets with the best opportunities, and less on underperforming ad sets.
The amount that you set can apply to each day the campaign runs (daily budget), or over the lifetime of the campaign (lifetime budget). If you use a lifetime budget, you can choose to run ads on a schedule. In that case, CBO works even if your active ad sets have different start and end times.
Pro tip: CBO may not spend your budget equally for each ad set. For example, if you have two active ad sets in your campaign, Facebook might spend 90% of your budget on one ad set if that's how we can get the overall best results. Therefore, when you use CBO, it's important to analyse results at the campaign level, rather than at the ad set level.
So for this blog post, we’ll run with CBO. Set a daily or lifetime budget and click next.
Once you have your campaign created, the next step is to set up your ad set and audiences.
Before we jump into audiences, ad sets are also where you specify the event/conversion that you want to report against. This is why we setup the pixel and events earlier in the process, so that by the time you come to this section, you just need a few clicks to get set up.
The easiest way to think about ad sets is that they represent specific audiences that you want to target with your ads. If you're just starting out with paid advertising on Facebook, it's likely that you'll have to experiment with several different targeting options until you reach an audience that fits just right.
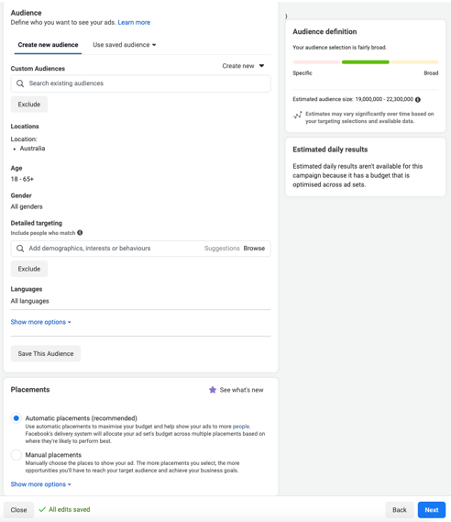
To help you narrow your focus, Facebook's targeting criteria are accompanied by an audience definition gauge. This tool — located to the right of the audience targeting fields — takes all of your selected properties into consideration in order to come up with a potential reach number. Having said that, this estimate is not so accurate post-iOS14!
Pro tip: At the ad set level, you also choose whether you want your ad set to have “Dynamic creative” or not. Dynamic creative takes multiple ad components (such as images, videos, titles, descriptions and CTAs) and then optimises them to deliver efficient results for each impression served. These help you create personalised creative variations for each person viewing your ad, with performance that scales.
Dynamic creative is a great optimisation tool when you're unsure what creative resonates with different audiences. As you will only be able to see aggregate performance of all delivered variations, Facebook don't recommend dynamic creative as a substitute for split testing.
The really important tip here, is that when you select “Dynamic creative” for your ad set, you can only add one ad (with different variations). This doesn’t work so well when you want to A/B split test different content offers (lead magnets) for example with different creative and landing page URLs. If you prefer the latter, leave dynamic creative turned off.
When it comes to audiences, you can either a) create a new audience from within the ad set or b) create an audience via Facebook’s Audiences tool within Business Manager. For now, we’ll create a TOF audience from within an ad set.
One of Facebook’s superpowers is their audience targeting.
Facebook's built-in targeting is vast, including options such as:
Location
Age
Gender
Languages
Relationship
Education
Work
Financial
Home
Ethnic Affinity
Generation
Parents
Politics (U.S. only)
Life Events
Interests
Behaviors
Connections
What really helps here is understanding your buyer persona/avatar in detail. Once you know your dream customer, the audience targeting in Facebook becomes easy.
For this example campaign, I’ve used the following parameters:
Audience name: HubSpot Helen (Sydney)
Location: Sydney +40km
Age: 30-55
Gender: All
Interests: HubSpot
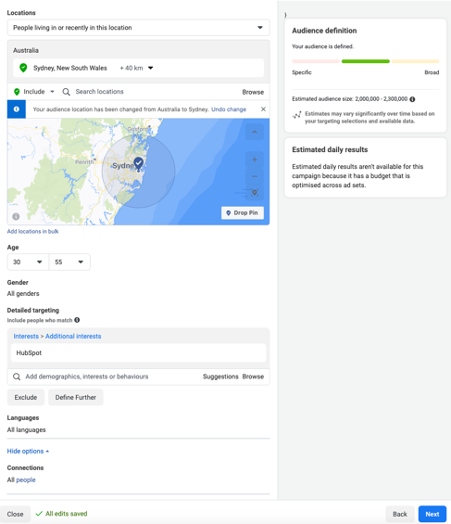
This audience has an estimated size of 2-2.3 million which is quite large. There’s a lot of debate around the “ideal” Facebook audience, but I’d recommend anything from 200k - 1 million as a sweet spot. This gives the Facebook algorithm enough of an audience to do its work! However, if you’re not getting results with this audience size, I’d recommend refining it further and running some tests to see which audience is outperforming.
Pro tip: The above example audience would be classed as a “broad interest” TOF audience due to its broad demographic targeting and interests. For this reason, our naming convention for this ad set would be “CC – TOF – Broad interests.” This helps us to understand quickly the selected targeting.
Once you’ve created this audience you can click on “Save This Audience” in the bottom left which will save this to your Audiences.
Pro tip: If you’re A/B split testing multiple ad sets (audiences), try to keep the audience size of each ad set similar or not more than 100% of another ad set audience. For example, if you’re testing three ad sets:
Ad set/audience A: 200k
Ad set/audience B: 500k
Ad set/audience C: 1m
Because ad set C has the largest audience (800k larger than ad set A), it will get the lion share of your daily budget if you’re using CBO. Facebook recommends that you refine each ad set/audience so that their audiences are closer in size (see below):
As mentioned and displayed above, you have the ability to quickly create an audience from within the ad set tool. However, I recommend actually creating your audiences directly using Facebook’s Audiences tool.
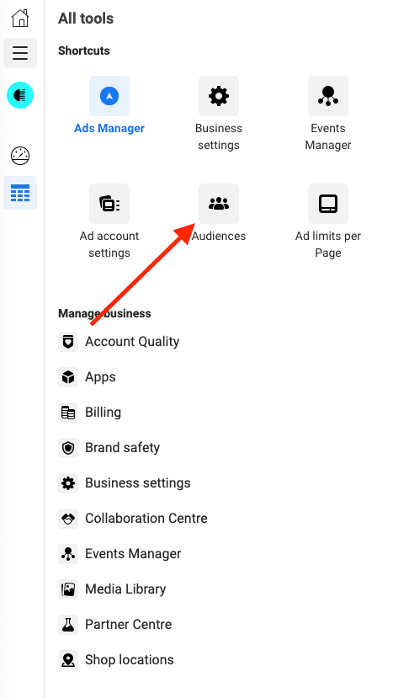
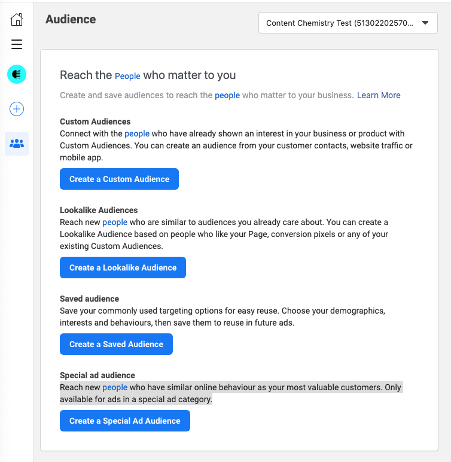
Within Facebook Audiences tool, you have the ability to create the following types of audiences:
Custom audiences: Connect with the people who have already shown an interest in your business or product with Custom Audiences. You can create an audience from your customer contacts, website traffic or mobile app.
Lookalike audiences: Reach new people who are similar to audiences you already care about. You can create a Lookalike Audience based on people who like your Page, conversion pixels or any of your existing Custom Audiences.
Saved audience: Save your commonly used targeting options for easy reuse. Choose your demographics, interests and behaviours, then save them to reuse in future ads.
Special ad audience: Reach new people who have similar online behaviour as your most valuable customers. Only available for ads in a special ad category.
The three main types of audience that we want to focus on here are:
Top of funnel (TOF) – Broad interest “cold/awareness”
Top of funnel (TOF) – Lookalike “cold/awareness”
Middle of funnel (MOF) “warm/consideration”
Bottom of funnel (MOF) “hot/decision”
For this audience, click on “Create a Saved Audience” and enter your desired location, demographics and interests. The example above of “HubSpot Helen” is an example of this type of audience.
Facebook’s lookalike audience tool is really powerful and complements your TOF – Broad interest audience as another cold audience to A/B test for your campaigns.
To get started, click on “Create a Lookalike Audience.”
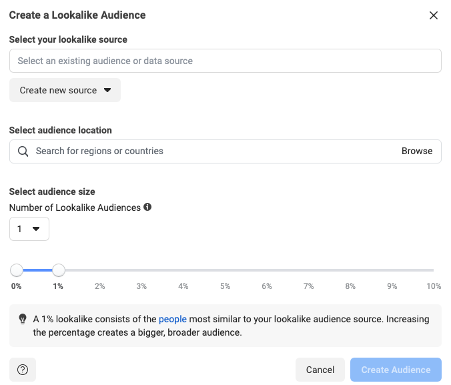
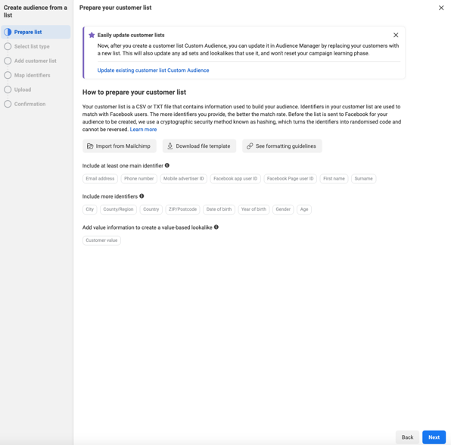
For this example, as the “source” for the lookalike audience, we’ll upload a list of our customers. Select “Customer list” in the options below after correctly formatting the data.
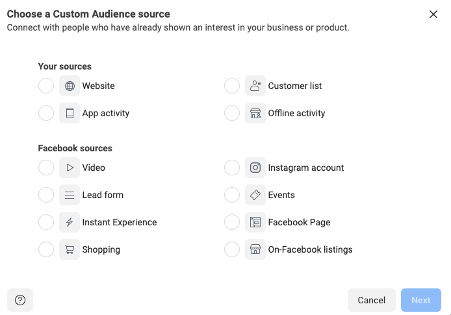
When you click on “Customer list,” Facebook gives you a few options to import this data and a file template that can be used.
After uploading your customer list, you can select how many lookalike audiences you’d like to create based on a percentage of how similar they are to your customer list (in this case). Increasing the percentage creates a bigger, broader audience.
Pro tip: I recommend starting with a 0-1% lookalike audience first and see how large the audience size is. If it’s too small, go back and create a 0-2% or 0-3% lookalike audience. Also in terms of naming conventions, we would name this audience “CC – TOF – Customer lookalike (0-1%)” to know exactly what it is.
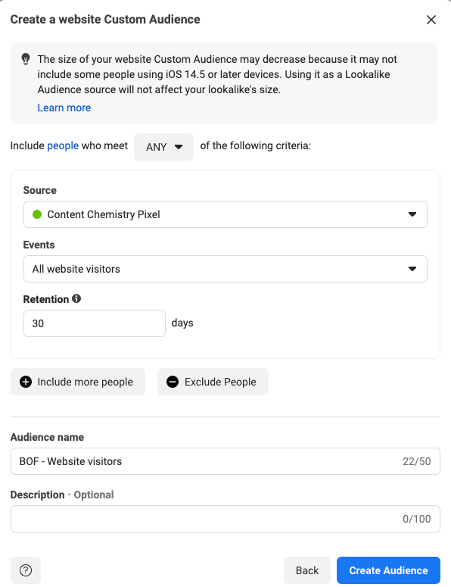
The next audience I recommend creating is your middle of funnel (MOF) audience of people who have engaged with you on Facebook and/or Instagram.
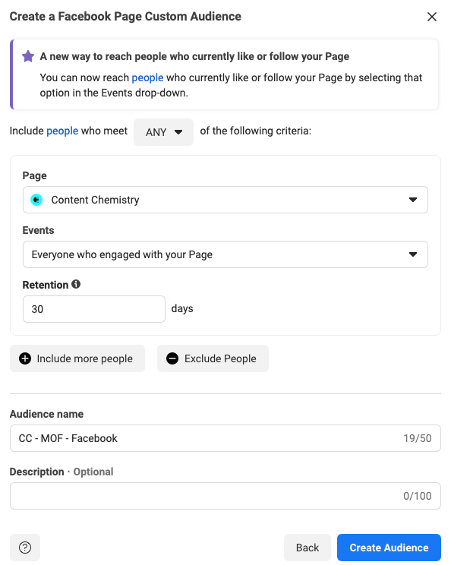
To set this audience up, click on “Create a Custom Audience” and select “Facebook page.”

In the next popup, you’ll select the Facebook Page to link the audience to, you’ll select the required events to add someone to your audience and you’ll define the retention of the audience.
In other words, the number of days that people will remain in your audience after they engage with your content. People will be removed from your audience after the set time period unless they engage with the content again. The maximum retention time is 365 days.
Here is a list of events that you can select from when you select a Facebook Page Custom Audience:
People who currently like or follow you Page
Everyone who engaged with your Page (easiest)
Anyone who visited your page
People who engaged with any post or ad
People who clicked any call-to-action button
People who sent a message to your Page
People who saved your Page or any post
It’s the same approach when creating a MOF – Instagram audience for engagement with your Instagram profile.
The next audience you should create is your “bottom of funnel (BOF)” audience of people who have visited your website or specific pages on your website that signals high intent and consideration or decision on the buyer’s journey.
In this case, you select “Website” as your custom audience source and work through the same options as above.
Now that you have your core TOF/MOF/BOF audiences set up, you’re ready to start running your campaigns!
Once you’ve got your campaigns, ad sets and audiences ready to go, the final step is creating your ad.
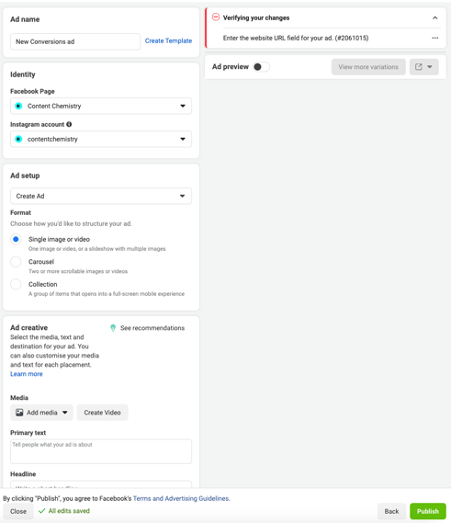
There’s a few key steps at this stage, including:
Connecting the correct Facebook Page
Connecting the correct Instagram account (recommended)
Choosing a single image or video, carousel or collection
Uploading your image(s) or video
Adding “Primary text” (i.e. Tell people what your ad is about)
Add a headline(s). Facebook allows you to test up to five different headlines in the creative here
Choose a call to action (e.g. Learn More)
Add a website URL destination for the ad
Ad creative that cuts through to your target audience and gets a healthy click through rate (CTR) of 1% (or higher ideally) is super important to the success of your Facebook campaigns.
Here is a breakdown of the different type of ad formats you can use.
Single image ads are the standard for Facebook advertising. They are easy to make, offer a clean format for you to promote your brand, and are one of the most effective ad formats. In one Facebook study, a series of photo-only ads outperformed other ad formats in driving unique traffic.
Image ads are best for when you want to create an ad quickly or don’t have much of a budget. You can create a Facebook ad right from your Facebook page as a boosted post, or if you want more detailed targeting options, you can make one in Facebook Ads Manager.
Video ads let you show off your product or brand and capture viewers’ attention in the feed. You can create video ads in Facebook Ads Manager or boost a post that has a video from your Facebook page. These ads appear on Facebook, Instagram, Audience Network, and Messenger.
You can use Facebook video ads to show unique features or tell your brand’s story. Videos that are 15 seconds or less can help capture your audience and keep them engaged. They should also have a clear call to action (CTA) at the end, such as purchasing a product or visiting a website.
Pro tip: You can create custom audiences based on video views, which is another great “middle of funnel” (MOF) audience.
Carousel ads let you include up to 10 images or videos in a single ad, each with its own link. People can scroll through the carousel by swiping left or right on their devices or by clicking directional arrows if using the desktop client.
You can use carousel ads to:
The collection ad format includes a full screen, Instant Experience to make it easier for people to browse and buy your products. These ads include a cover image or video and can show multiple products underneath.
The reality is that Facebook is a beast of a platform and takes years of experience to fully master. However, this ultimate guide will set you up for success and give you the foundations to run profitable Facebook ads for your business.
Because Facebook’s audience and targeting is so huge, it really allows you to get your business and brand in front of the right person at the right time. It’s ideal for B2B businesses, but if done well, it can also work great for B2B businesses, especially B2B businesses that are focusing on inbound or content marketing.
Thanks so much for taking the time to look through this epic ultimate guide. We’d love to help as much as we can if there are any questions or tips you’d like to know. And if you spot anything that’s changed about Facebook Ads since we’ve published, we’d be grateful for the heads up. Things move fast!